Tag Archives: Christmas

Holiday Cards 2020

Holiday Cards 2020

As I finished up my master’s degree in December of 2019, I made a promise to myself. 2020 was going to be the year of new experiences! My family had just moved to Austin, and between work and finishing up my graduate thesis, exploring our new home was something that felt impossible. Ironically, it seems doing anything in 2020 is impossible. This year has been ridiculously difficult. COVID-19 has essentially flipped the world on its head and left us all in a passive state of constant anxiety. I’d spent the majority of my time working from home this year — feeling positively stir-crazy. Fortunately, it allowed me to get creative in my personal life. When I wasn’t working on home projects, I dreamt up an elaborate holiday photo.

My family moved into a new apartment this summer, and we truly love it. We’re surrounded by lush greenery, nature, and wildlife. It’s beautiful and something I wanted to try and incorporate into our holiday card this year. Because we’re social distancing and trying to slow the spread of the virus, we couldn’t actually go anywhere to take our photo. We had to do the entire shoot from home (or at least within our apartment complex).

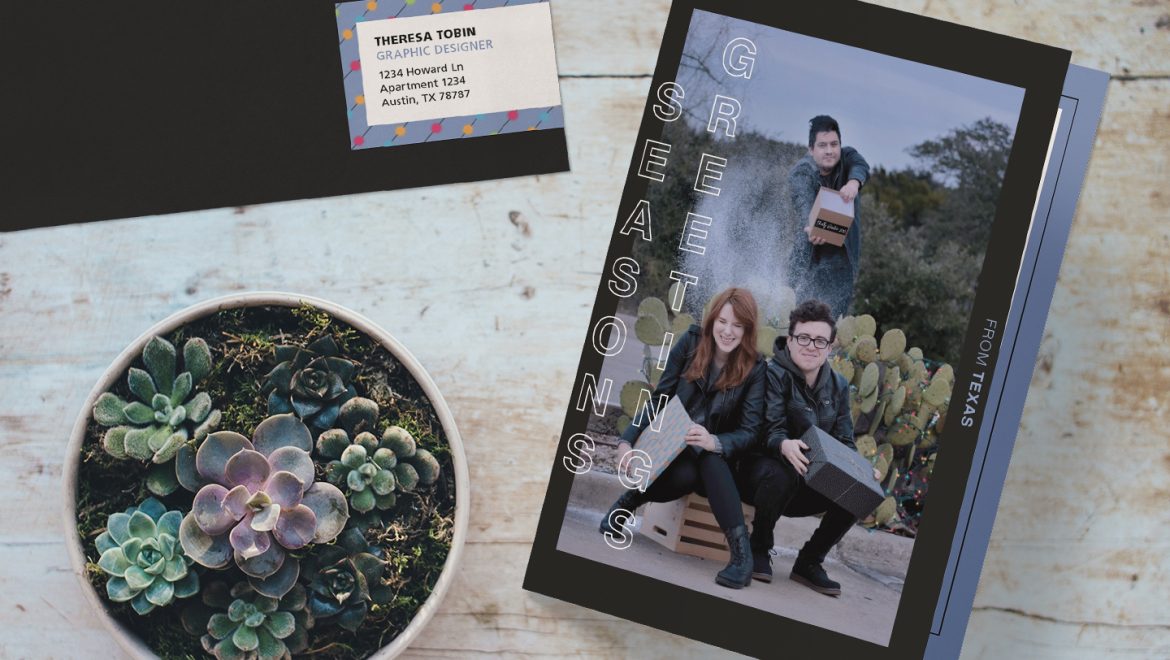
One rainy morning in October, the idea for our holiday photo popped into my head. I envisioned an outdoor study with three professors wearing glasses and smoking pipes. It seemed unique while being entirely ridiculous, and that reason alone sold the idea to me. Setting the scene would be laborious in that we’d have to build a backdrop and carry the furniture to our location, but my concerns were quelled remembering it’d all be within walking distance of our front door.

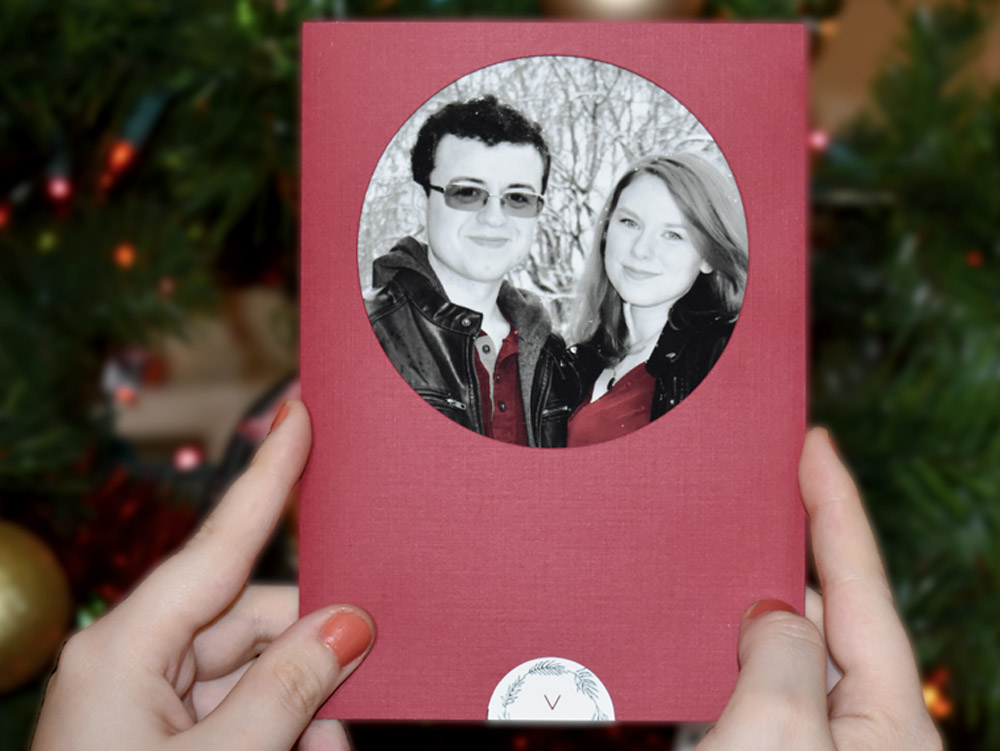
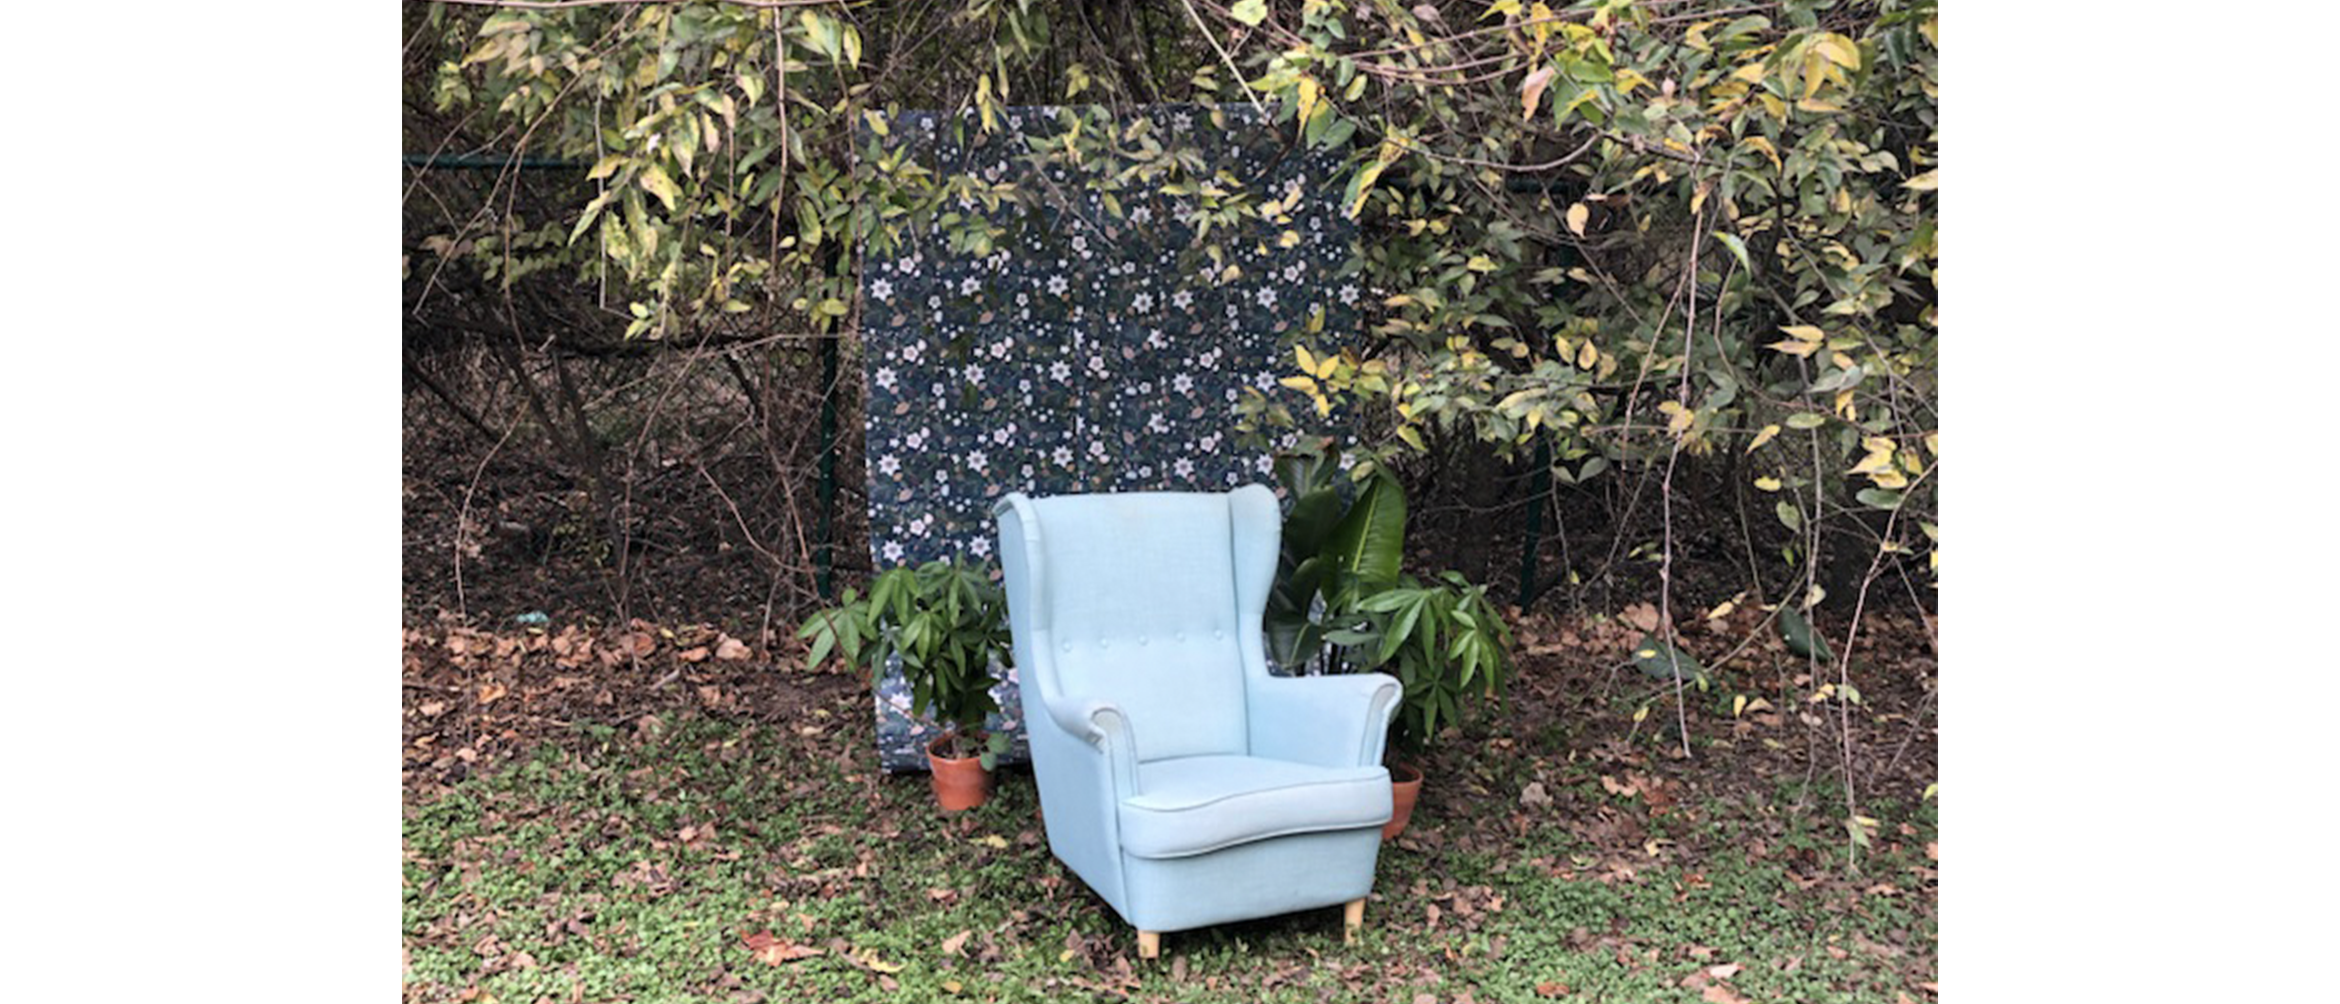
We decided to take the photo on Thanksgiving morning. Everyone would be home from work, and I’d have the weekend to edit the photos and get everything together. The boys and I sat on the floor that morning breaking down cardboard boxes from our Christmas shopping and duct-taping them all together. It looked like we were building a cardboard raft in our living room. We then wrapped it in wrapping paper Austin had brought home from IKEA, and the three of us carried it to a grassy area near our apartment dog park. We carried over the blue armchair in my office and a few plants from our porch and began to set the scene to the tune of barking puppies. It was windy, our backdrop fell several times, and I absolutely stepped in doggie doo. As glamourous as our struggle sounds, the photos came out beautifully. Our matching sweaters and pashmina scarves coordinated perfectly with the backdrop.

Photo setup

After some color correcting and light photo editing, I started to work with the card’s typography and layout. I decided to do a postcard layout this year because we were all feeling a little overwhelmed, and we still needed to print and send the cards out on time to our loved ones. Simplifying the design ended up working in our favor because it allowed the typography on the front to shine, while also making it easier for our relatives to hang our photo on the fridge.

2020 felt like an impossible year, but we made it through it. I’m proud that we were able to spread some holiday joy to our friends and family this year, despite the hardships that come along with the pandemic. Putting these cards together annually means so much to me, and accomplishing it this year in particular, makes things feel just a little more normal.

Holiday Cards 2019

Holiday Cards 2019

This was my little family’s first Christmas in Texas, and we were so excited. By this point, we’d all settled into a sense of stability. We each had jobs, our lives had worked their way into a routine, and we were exploring our new home inch by inch every weekend. Every year, I try to find a way to make our holiday cards seem special. In Philadelphia, we used to run out during the first snow of the season in matching outfits and take a group photo. That kind of turned into a ritual for us the last few winters; however, we moved to Austin to specifically escape the snow. I had to come up with something a little different this year.

In October, during my daily commute, I would think about the holiday card on and off. I wanted to acknowledge our major life transition to a new city and somehow also tie in the irony that we left the snow behind us. Out of nowhere, it came to me one morning. I rushed into work and took as many notes as I could so I’d remember it later. We needed to put Christmas lights on a prickly pear cactus and throw fake snow that we ‘brought with us from Philly’. I was immediately excited, and Jon and Austin were immediately exhausted. We had to find all of the props, buy A LOT of fake snow from Michael’s Crafts, and find prickly pear cactuses that were accessible, looked photogenic, and we could spend some time with.

Finding the cactus was weirdly the hardest part. We went driving down a road here in Austin and we just kept heading west. We had to find them somewhere, right? A lot of them were on private property, or were fenced off on busy roadways. Naturally, we ended up at an abandoned Sonic. Honestly, it was perfect. We weren’t in anyone’s way, we could connect our lights to the car at the perfect distance, and we didn’t have to walk out of our way. An abandoned Sonic Drive-In was the best case scenario for us.

We strung the cacti with colorful Christmas lights and posed with our presents. Our roommate, Jon, stood on top of a wooden crate with a box filled with ‘snow’ labeled “Philly Winter 2018,” and anxiously awaited my countdown. With the camera set to burst shutter, we had to get one good shot of Jon throwing the snow in the air. We had three bags of snow, yielding three total tries. He nailed it on the last attempt. The photos turned out super cute and I was excited to share this new set of cards with our families!

The holidays are always a little labor-intensive for us. I have to schlep the boys out for an over-elaborate photo, and then we spend the next three days held up in our walk-in closet fighting with the Epson printer in an attempt to make each of our loved ones a card. Getting them out in time takes some sort of magic, in itself. The process is hard, but hearing from our relatives that they look forward to it and that they love them year after year makes it worth it.

Holiday Cards 2018


Holiday Cards 2018

Every year since I first started University, I’ve made an effort to design and produce my own holiday cards. In the past, I loved sending them out to friends and family to spread holiday cheer and show how I’ve grown as a designer. To be honest, I love sending them out because it encourages my friends and family to also send a card my way. Receiving my family’s Christmas photos makes it feel like we’re celebrating together – despite the fact that they’re thousands of miles away.

This year, I also wanted to send holiday cards to designers that inspire me. It’s so easy to share your work with the world now, and I find myself following a number of artists on Twitter and Instagram. Some live in cities I’ve never visited, and others speak languages I don’t know. Regardless, I wanted to reach out and send some seasonal joy their way.

I’ve been contemplating on and off since September what I wanted the cards to look like. I was recently inspired by the line work used in optical illusions. I didn’t want my final design to make anyone’s brain throb, but I’ve been interested in the dynamic quality the lines would often have. I knew I wanted to somehow incorporate that, but I wasn’t sure how to go about it. As I was falling asleep in some time around my birthday, I finally had that eureka moment and knew what I wanted the cards to look like. At 11:30 at night, I turned on my bedside light (waking up my boyfriend in the process), and began to scribble in my notebook. I wanted to do high contrast dynamic black and white lines weaving around bold red type with some collage work.


I started the project off by visiting my local Michaels. I dug through their faux plant section hunting for cinnamon scented pine cones, pine tree branches, and currants. Because I figured out my concept in October, a lot of foliage was a beautiful orange color…or dead. Either way, it wasn’t very reminiscent of the ‘Winter Wonderland’ spirit.

That night I shot each of the pieces individually on my living room floor and mentally prepared to cut each pine needle out in Photoshop for the next few days.

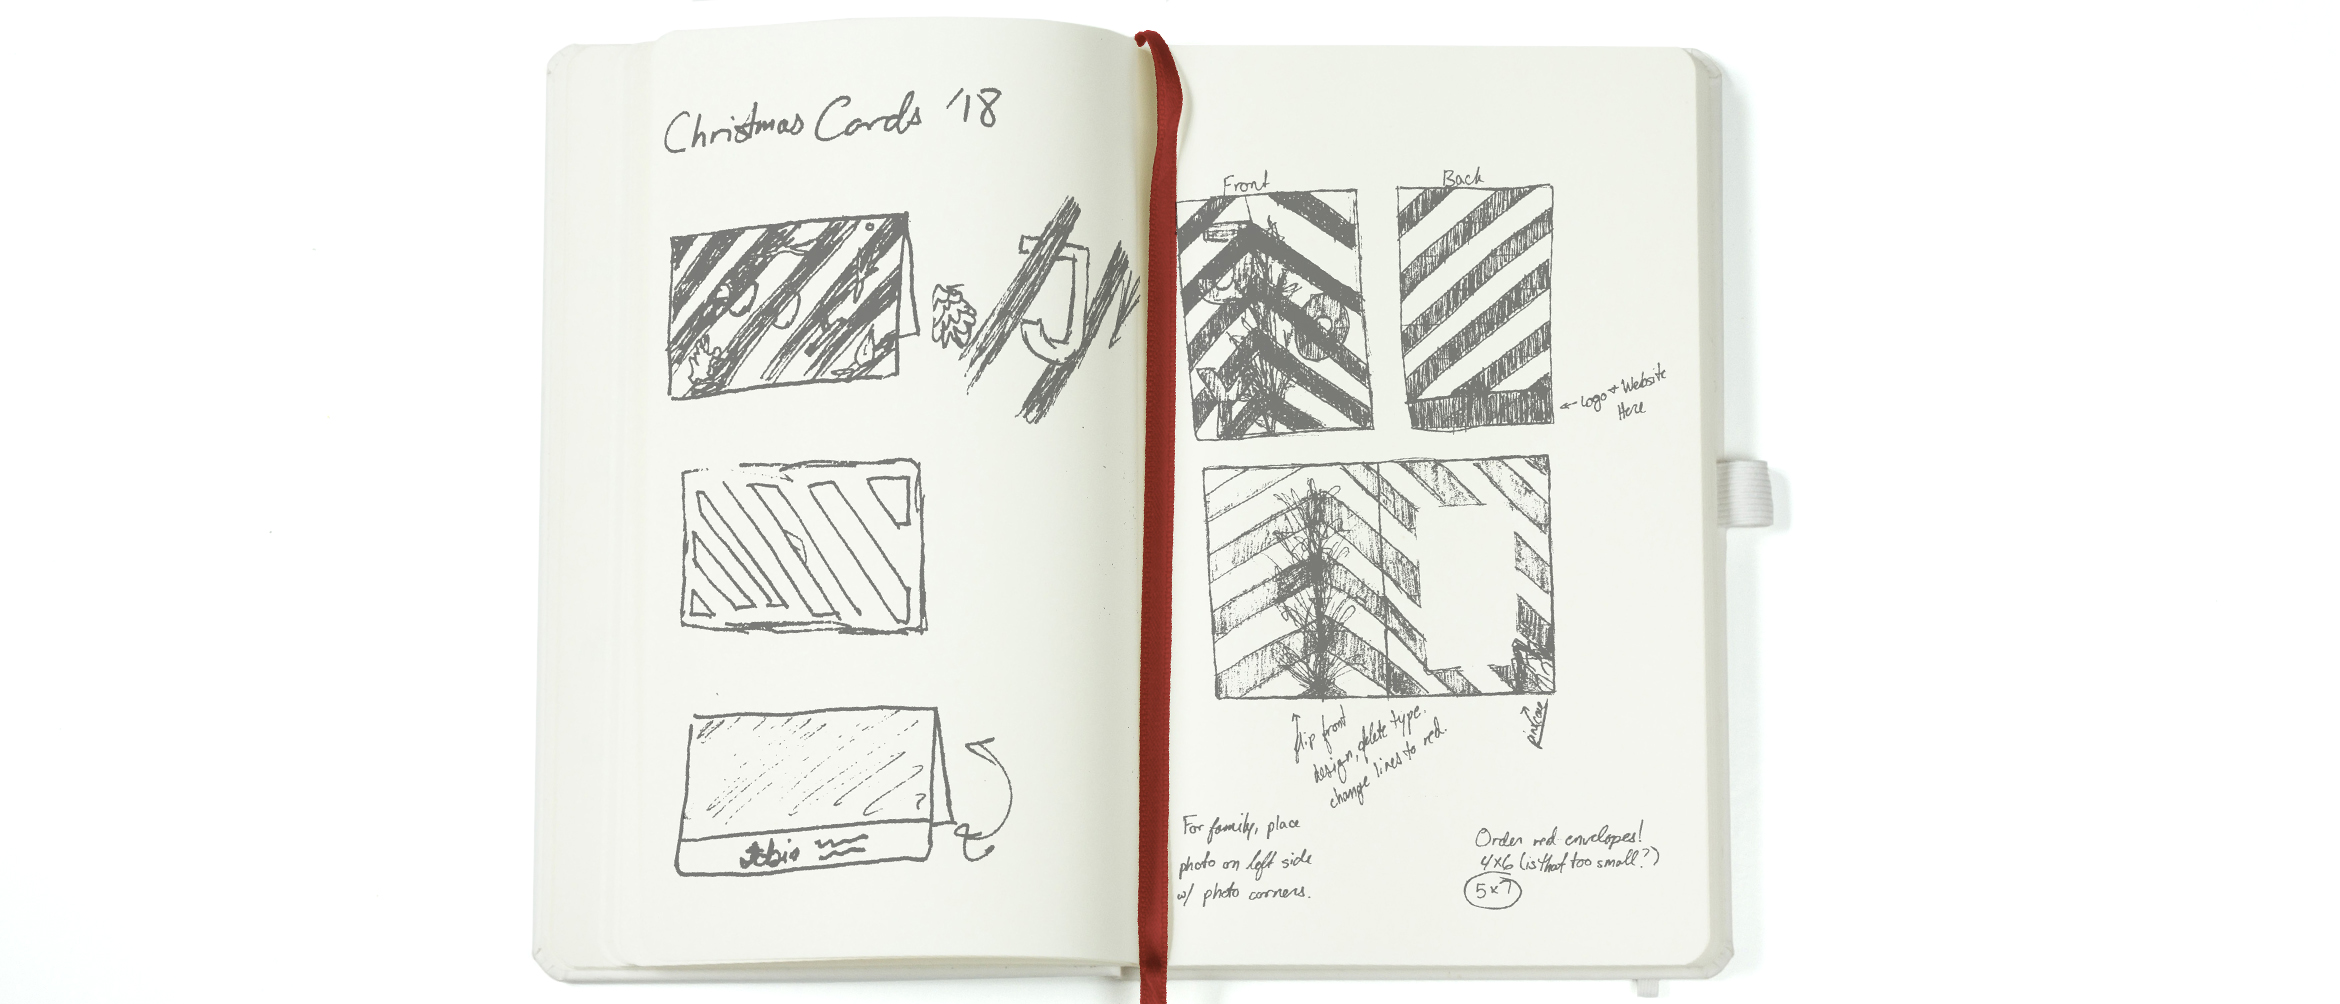
In my initial sketch, I planned on using a landscape orientation for the card. I figured I could weave the lines in and out of the text and build a border using my collaged nature. Once I had it laid out, I couldn’t help but feel unsatisfied. At the end of a project, you should feel good. You should have that prideful “I made that” moment. I knew something was wrong, but I couldn’t quite pin it down. I loved my initial concept but felt the whole thing ended up looking safe and predictable. After three years of typography and a number of years studying composition, I decided to start over with a blank sheet. I had all the elements to make a great card – I just had to use my brain.

I revisited my sketchbook and tried to disrupt my design thinking by using a portrait layout instead. By just looking at it sideways, I noticed that I liked the lines pointing upward instead of to the right. I started thinking that I could use them as a visual cue for my composition. Moving them off center helped make my composition less static, but I wanted to stagger the type to activate more of the space rather than just stacking it vertically. I also felt that using a Christmas ornament in the ‘O’ has been done about a million times. I didn’t want to follow that cliché, so I scrapped it. Pushing the foliage together and having it directly interact with the type and line work added interest to the composition and made it look less random.

The new design had something the old one lacked: purpose. The elements weren’t thrown together haphazardly anymore, they were interlocked and working together.

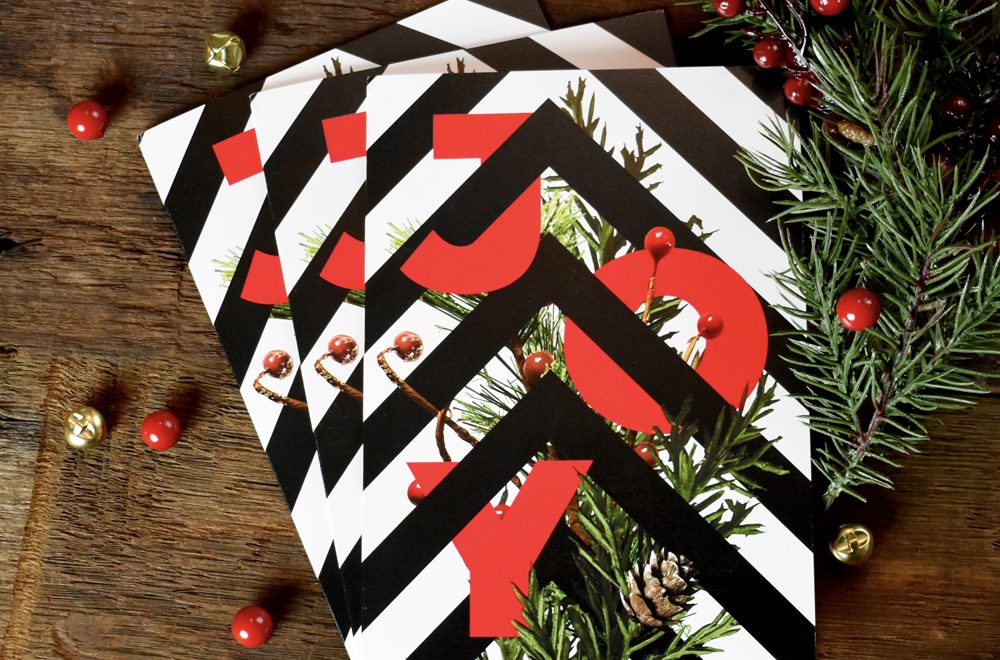
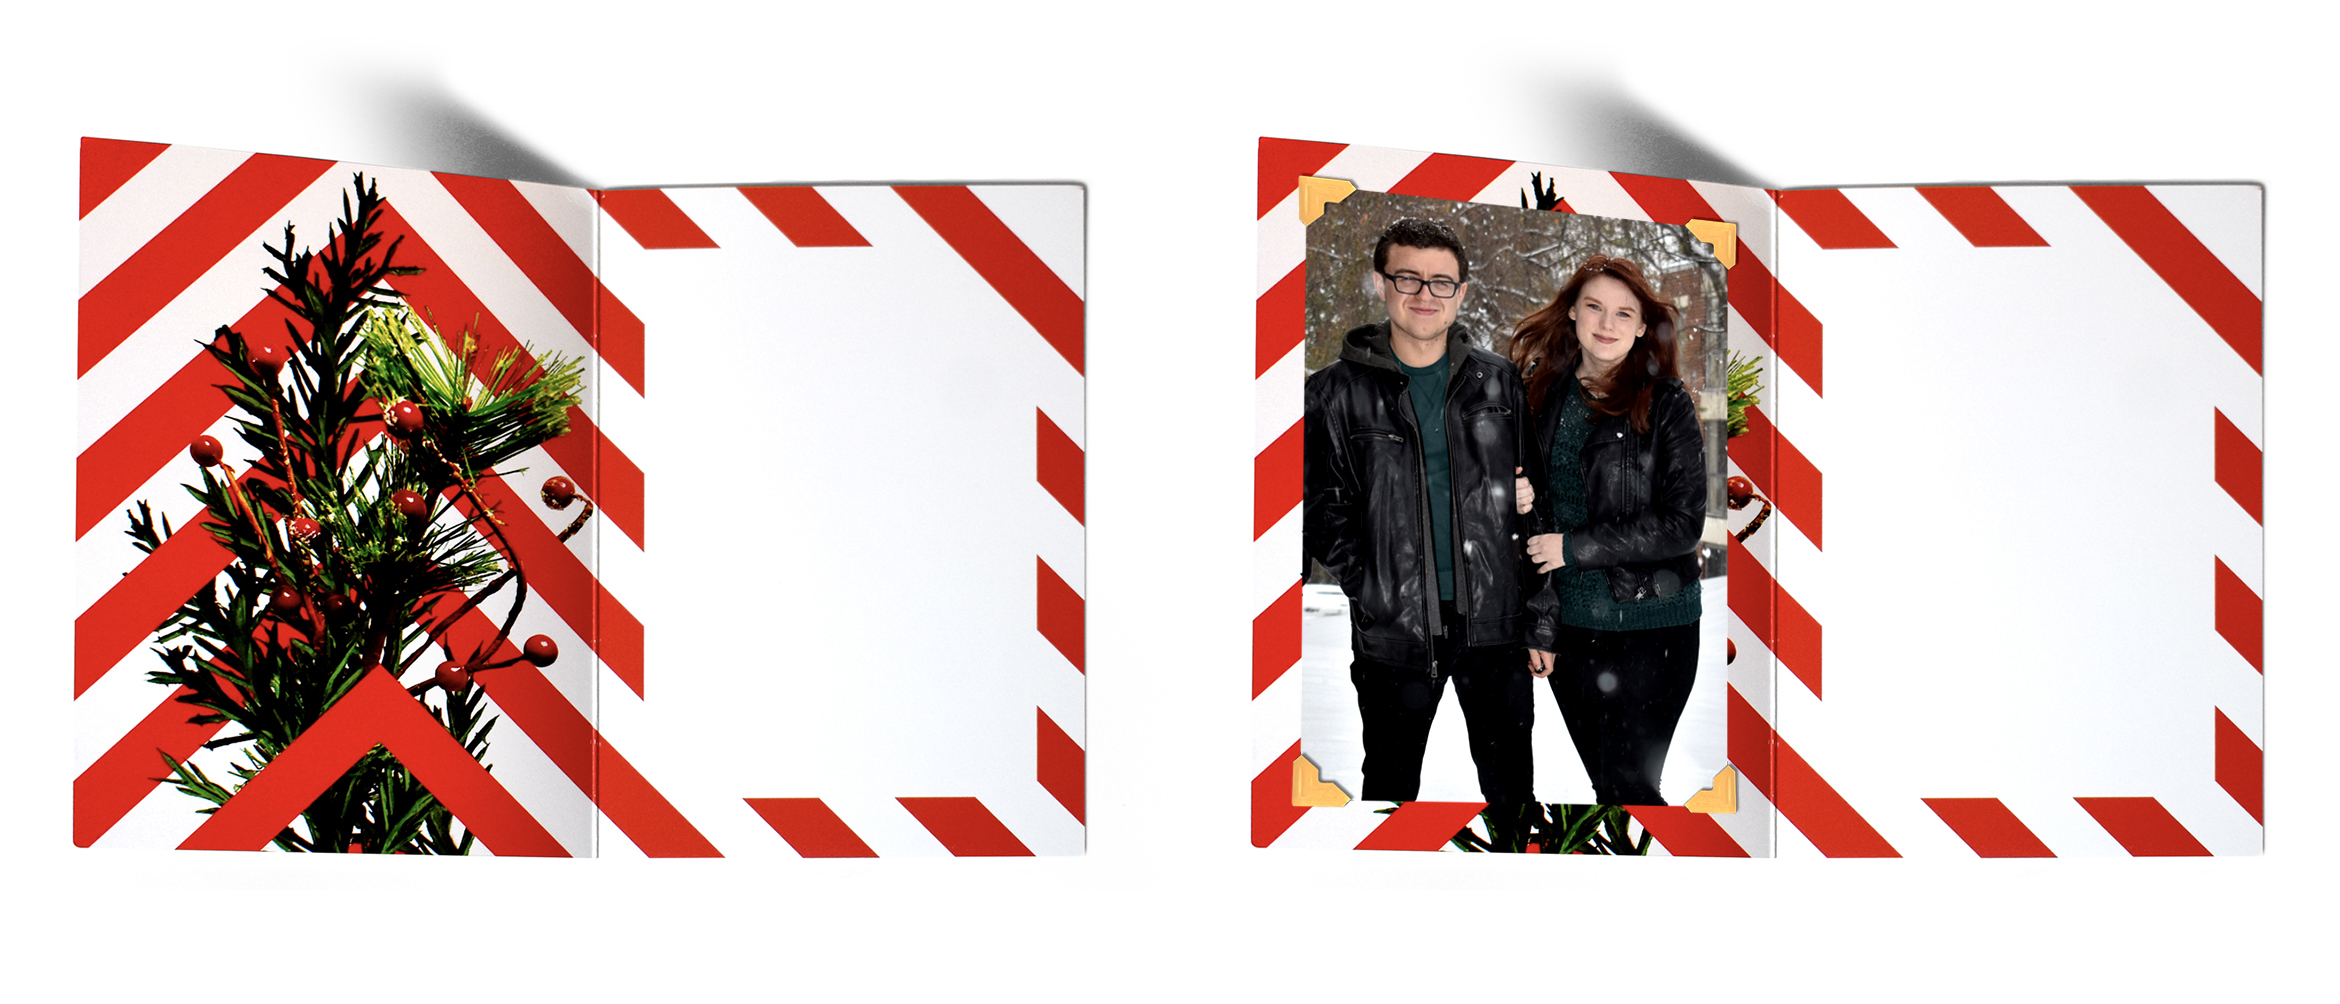
I knew I wanted the inside of the cards to have an unexpected pop of red that still felt connected to the exterior of the card. The inside has a candy cane stripe that is the direct reverse of the pattern on the exterior of the card. Because of this, I also wanted to show the back side of the foliage. Lines that were previously covered by branches in the card’s exterior now sit in the foreground. I did this to give the design a three-dimensional perspective.

As a student, I don’t have an endless supply of money. I knew that these cards would be sent out to family and to designers I admire. Most likely, those designers don’t want the annual holiday photo my mom looks forward to every year. It was important that the inside of the cards had a solution for both audiences. I still loved the brass bells I shot in the first draft of the card. They didn’t make it to the final draft, but I wanted to still incorporate their color and texture somehow. In cards sent to family and friends, we printed our holiday photo and attached it with brass colored photo corners. This allowed them to remove the picture to place it in photo albums while not disrupting the final design. This also meant that the printer only had one design to print, instead of two; thus, reducing the cost of the job substantially.

I think my favorite part about this project was that I was able to send holiday joy to friends and family, as well as strangers I admire, by making my design flexible.

Holiday Cards 2017

Tis the season to morph my dining room into a design studio! Making my annual holiday cards is one of my favorite labors of love. Usually they’re a fun little piece of design I can send my family to spread a little joy every December; however, 2017 had a bit of a rough landing for me. The end of my Fall Term was enough work as it usually is, but was topped off by Drexel announcing the senior graduation dates. This meant I had graduation announcement cards to produce on top of my holiday cards that weren’t even designed yet. It was an extra item on my to-do list and I worried I wasn’t going to be able to finish everything. Austin and I decided to print and assemble the cards together at home for both graduation and the holiday season to save a little money and not have to deal with a professional printer. It was a financially savvy decision that resulted in us staying up most nights fussing with our die cutter and running back and forth between the printer and a cutting mat to score and cut every page. Somehow we managed to get everything out in the post a week before Christmas. That being said, the holiday cards went out a little later this year, so check your mailboxes a couple days after Christmas. I’m only human!

When it comes to the design of this year’s card, I wanted it to be elegant and personal all at once. After having lunch with my bosses at Michael Graves, I saw they were sending their holiday cards out in shimmery silver envelopes. Originally, my holiday cards were going to go out in some craft paper envelopes I had left over from my graduation invitations, but I’d immediately fallen in love with the silver envelopes at Michael Graves. Because my design was primarily black and white with pops of red, I felt like using these envelopes worked to elevate my design and make the entire package a little more cohesive than using a random brown color. Not only that, but I conveniently found them on sale at Staples when I was shopping for ink – obviously it was fate.

I always try to add an interactive graphic element to my cards. Every year we try to include a photograph of ourselves to send to our relatives, but I never want it to look like a Shutterfly template. I’ve spent too much money at Drexel learning about design to allow that to happen! The interactive element this year was a simple sleeve with a circle cut out to reveal our faces. It feels like an obvious choice, but I love how it simplifies the design and gives it a streamlined appearance. I chose a red stock for the sleeve that’s lightly textured to contrast the smooth paper used in the actual bi-folded card and the shimmery envelope. Once you pull on the downward facing arrow, you release the bi-folded card from its sleeve and it reveals the full black and white picture of Austin and I standing together in the snow. We wore the same color shirt that day, so I color matched our shirts to the sleeve’s stock to create a connection between those two elements. I also felt like the pop of color could be the unifying factor throughout the entire design.

Because the front of the card is so black and white, with very sparse areas of red, I wanted the inside to be an unexpected surprise. Once you open the card, you see a flood of red that matches our shirts in the picture and the sleeve. The flood of color is broken up with a tree branch texture I created that’s been placed at a low transparency in the back to activate the space and reference the trees in the photograph of Austin and I. I used the typeface Cursive Script for “Merry & Bright” because I felt like it was a genuinely lovely script. To contrast the ornate script, I used Helvetica for my body copy just to bring back some geometry to the piece. As a personal element, Austin, Wiggles, and I signed each card with white ink.